This velvet ribbon bow hair clip would make a great accessory for Valentine's Day or any day when you want to add a bit of whimsy and romance to your outfit.
I've been slightly obsessed with a similar bow from blogger Elsie Larson's shop Red Velvet (seen on my Valentine's Day wish list here) for a while now. So, I decided to make something similar for myself.
My version is smaller than hers and I made both loops the same length, but you could make yours truer to the original inspiration if you wanted.
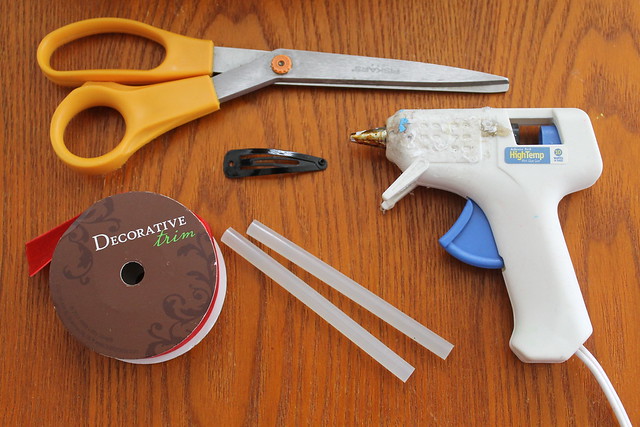
You will need:
- One spool of velvet ribbon
- Scissors
- A glue gun and glue sticks
- A hair clip
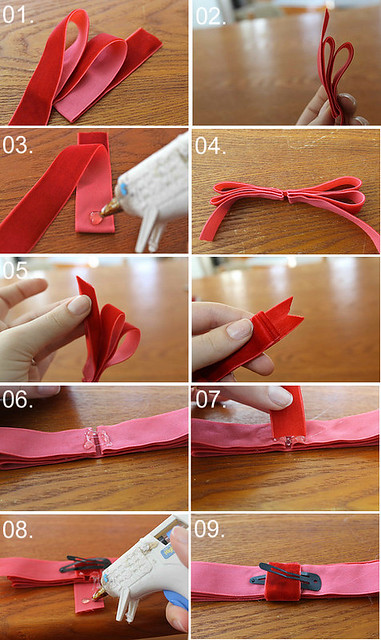
Step 1. Make two equally long loops, leaving a tail a bit longer than the loops as shown.
Step 2. Pinch the ribbon as shown to get an idea of how big your bow will be. This will be half the bow. Is it a good size? Adjust if need be.
Step 3. With a small dot of glue between each layer, secure these loops at the base.
Step 4. Do the same with the other side of the bow.
Step 5. Cut the ribbon so that the second tail is as long as the first one. Trim the tails into a forked end by folding the ribbon in half vertically and trimming at an angle as shown.
Step 6. Working quickly, apply a good amount of glue to the middle underside of the bow, making sure to get glue on both sides of the crack.
Step 7. Placing wrong sides together, press a fresh piece of ribbon so that it's end is flush with the edge of your bow as shown.
Step 8. Wrap the ribbon around the bow. Lay your clip on top of the bow (the underside) and apply glue to the end of your working ribbon.
Step 9. Fold the ribbon over, tucking it inside your clip so that the glue you've just applied holds the ribbon and the clip in place. Trim the end to make it flush with the bow's edge.
Enjoy your new, whimsical and romantic accessory!


Hi! I found you through Refinery29 Blogger contest! I like your style, it's so cute! My vote is on u! I'm your new follower too, hope we can follow each other! xx
ReplyDeleteRomiya Fashion Inspiration Blog
awww, that's so amazing! I have to try it!X
ReplyDeletehttp://asterisque5.blogspot.com